 Save
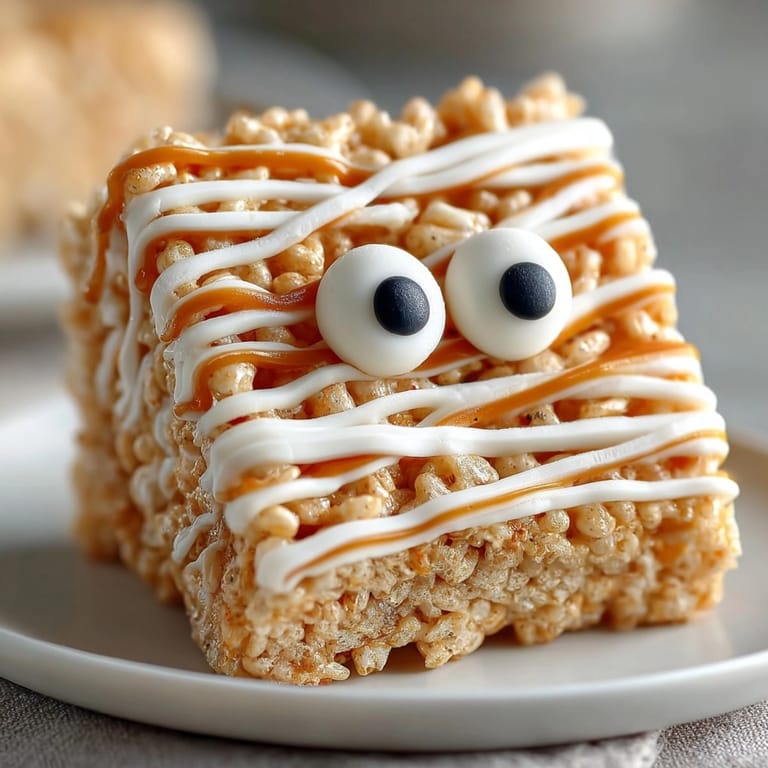
Save Spooky and sweet, these Mummy Rice Krispie Treats bring big smiles every Halloween at my house. Soft marshmallow bars get jazzed up with silky white chocolate and candy eyes for a playful dessert that is impossibly easy to make. If you want edible crafts that delight both kids and adults, this recipe will quickly become your go-to seasonal tradition.
Kids love helping assemble these mummies and I have fond memories of us laughing while sticking on the candy eyes and trying not to sneak bites before they set.
Ingredients
- Rice Krispies cereal: ensures crispy chewy texture use the freshest box for extra crunch
- Mini marshmallows: bring sweetness and help hold things together buy a soft bag avoid dried-out mallows for smooth melting
- Unsalted butter: adds rich flavor and keeps bars tender choose high-quality butter for best taste
- White chocolate chips or candy melts: create the mummy look try to pick quality melts for smooth drizzling
- Candy eyes: add personality buy extra so everyone can decorate a treat just how they want
Tired of Takeout? 🥡
Get 10 meals you can make faster than delivery arrives. Seriously.
One email. No spam. Unsubscribe anytime.
Instructions
- Prepare the Pan:
- Line a nine by thirteen inch baking pan with parchment paper pressing the paper into the corners to prevent sticking and allow easy removal later
- Make the Marshmallow Base:
- Melt butter slowly in a large saucepan over low heat then add mini marshmallows and stir constantly until completely smooth ensuring no lumps remain and the mixture is glossy
- Combine with Cereal:
- Immediately remove the saucepan from heat then add Rice Krispies cereal and stir briskly using a spatula to coat every piece being gentle to preserve the cereal crispness
- Shape into Bars:
- Transfer this gooey mixture to your prepared pan spreading evenly and gently pressing down with a buttered spatula or piece of wax paper to pack the treats but not crush them let cool at room temperature for about thirty minutes until set
- Cut and Portion:
- When the bars are firm lift the treats out using the parchment handles then cut carefully into sixteen equal rectangles using a sharp knife for clean edges
- Melt the Chocolate:
- Place white chocolate chips or candy melts into a microwave safe bowl heat in short bursts of thirty seconds stirring thoroughly between intervals until completely melted and silky without scorching
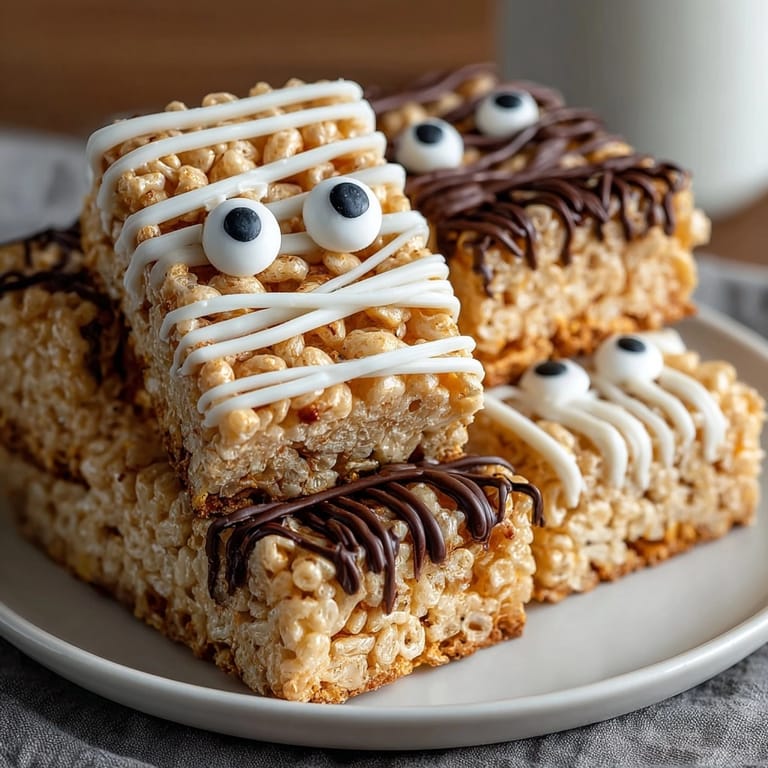
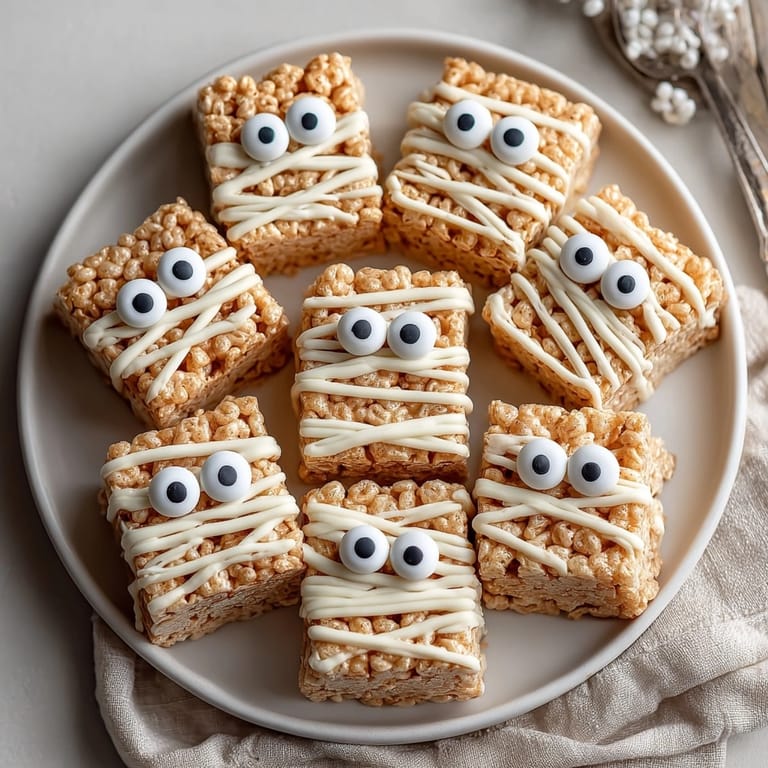
- Decorate Like Mummies:
- Working quickly dip the top of each treat into the melted chocolate or drizzle with a spoon making random lines for the classic mummy bandage look
- Add Candy Eyes:
- Before the chocolate hardens gently press two candy eyes onto each treat adjusting placement so every mummy has a unique expression let sit at room temperature until the chocolate sets firm
- Serve and Enjoy:
- Once decorated and cooled these treats are ready to serve place on a festive platter for maximum holiday impact
 Save
Save Making these treats with my kids always sparks giggles especially when the candy eyes end up in funny places or the chocolate swirls look extra silly. My favorite ingredient is the white chocolate because even simple drizzles look professional and elevate these classic bars.
Storage Tips
Keep your finished treats in a tightly sealed container at room temperature for up to three days They stay wonderfully chewy Avoid refrigeration since it hardens the marshmallow base and makes the bars tough If stacking place parchment between layers
Ingredient Substitutions
Swap standard Rice Krispies with any crisp rice cereal available for more options If you run out of mini marshmallows large ones work just chop them up Use milk or dark chocolate melts for a deeper flavor profile Allergy swaps include vegan butter and plant based marshmallows
Serving Suggestions
Pile the mummies on large platters surrounded by gummy worms or candy corn for an eye catching Halloween dessert table They travel perfectly for school parties and make fun lunchbox surprises Serve alongside apple cider or hot cocoa for cozy autumn vibes
Cultural and Historical Context
Rice Krispie Treats are a beloved American classic invented in the late 1930s as an easy no bake dessert Mummy-shaped treats have gained popularity in recent years thanks to creative home bakers embracing fun holiday themes Adapt this method for other holidays by switching candy eyes for colored sprinkles or themed decorations
 Save
Save Share these mummies with friends for instant smiles and a sweet Halloween treat. They’re always a hit and disappear fast at parties.
Recipe FAQ
- → How do I prevent sticky hands when pressing the mixture?
Butter your spatula or use wax paper to evenly press the mixture without sticking to your hands.
- → Can I use other cereals for these treats?
Absolutely. Swap Rice Krispies with other crispy cereals for a fun twist and flavor variation.
- → Should I melt white chocolate in the microwave or on the stove?
Both methods work. Microwave in short intervals, stirring in between, or melt gently on the stovetop.
- → Is there a way to make these gluten-free?
Choose certified gluten-free rice cereal and verify all other ingredients are free of gluten-containing additives.
- → How long do these bars stay fresh?
Store in an airtight container at room temperature for up to 3 days for best taste and texture.
- → Can I decorate with colored chocolate instead?
Yes, add food coloring to melted chocolate or candy melts for bright, playful treats.