Save
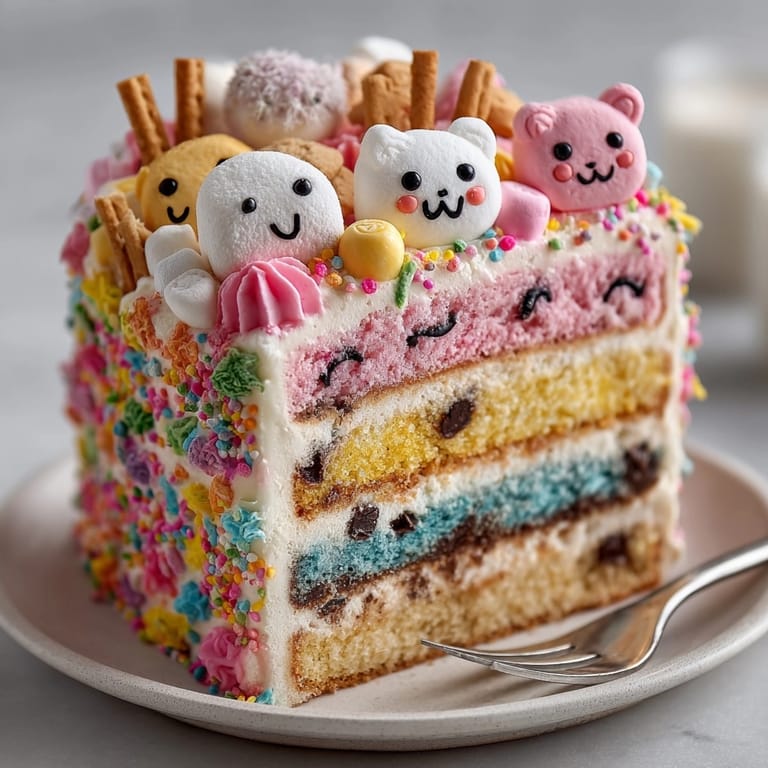
Save This whimsical Chaos Cake has been my secret weapon for turning ordinary celebrations into memorable events that leave everyone smiling. The combination of soft vanilla cake layers and colorful frosting creates the perfect canvas for unleashing creativity with silly decorations that both kids and adults adore.
The first time I made this cake was for my nephew's "unbirthday" party when we needed something spectacular without following rules. The pure joy on his face when he saw the riot of colors and candies convinced me that sometimes kitchen chaos is exactly what we need.
Ingredients
- All purpose flour: provides the perfect structure for a cake that's sturdy enough to hold decorations but still tender when sliced
- Unsalted butter: creates a rich flavor base that balances the sweetness look for European style butter for extra richness
- Vanilla extract: adds warmth and depth to both cake and frosting splurge on real vanilla for best results
- Food coloring gels: rather than liquid colors give vibrant hues without changing the consistency of your frosting
- Assorted decorations: from sprinkles to candy eyes let you express your personality through edible art
Tired of Takeout? 🥡
Get 10 meals you can make faster than delivery arrives. Seriously.
One email. No spam. Unsubscribe anytime.
Instructions
- Prepare Your Equipment:
- Begin by preheating your oven to 350°F and preparing your cake pans with a thorough greasing and flouring. This crucial step ensures your cakes will release perfectly after baking, giving you clean layers to work with. Take extra time to get into the corners of your pans.
- Create The Cake Base:
- Whisk your dry ingredients together until they're perfectly uniform, ensuring your leavening agents are evenly distributed. In a separate bowl, cream the butter and sugar until the mixture becomes notably lighter in both color and texture, which typically takes about 3-4 minutes of continuous beating. This creates tiny air pockets that will help your cake rise beautifully.
- Build The Batter:
- Add eggs one at a time, allowing each to fully incorporate before adding the next. This prevents the batter from breaking and maintains its smooth, emulsified texture. The vanilla and optional lemon zest should be mixed in until just fragrant, being careful not to overmix.
- Combine Wet And Dry Ingredients:
- Alternate adding your flour mixture and milk, starting and ending with flour. This technique prevents gluten development that would make your cake tough. Mix with a gentle hand, stopping as soon as the ingredients are combined, with no visible streaks of flour remaining.
- Bake To Perfection:
- Divide your batter evenly between pans, using a kitchen scale if available for perfect balance. Bake until the cake springs back when lightly touched and a toothpick inserted in the center comes out clean or with a few moist crumbs. Allow the cakes to cool in their pans for exactly 10 minutes before transferring to a wire rack to prevent them from becoming soggy.
- Create Colorful Frosting:
- Beat your butter until it's noticeably lighter in color and texture, then gradually incorporate powdered sugar to prevent a sugar cloud in your kitchen. Add milk and vanilla until you reach a spreadable consistency that holds its shape. Divide the frosting between bowls and add gel food coloring one drop at a time until you achieve your desired vibrant shades.
- Assemble And Frost:
- Place your first cake layer on a serving plate and spread a generous layer of your most vibrant frosting color. Position the second layer carefully on top, then cover the entire cake with a base color of frosting, creating a smooth canvas for your decorative elements.
- Unleash Chaos:
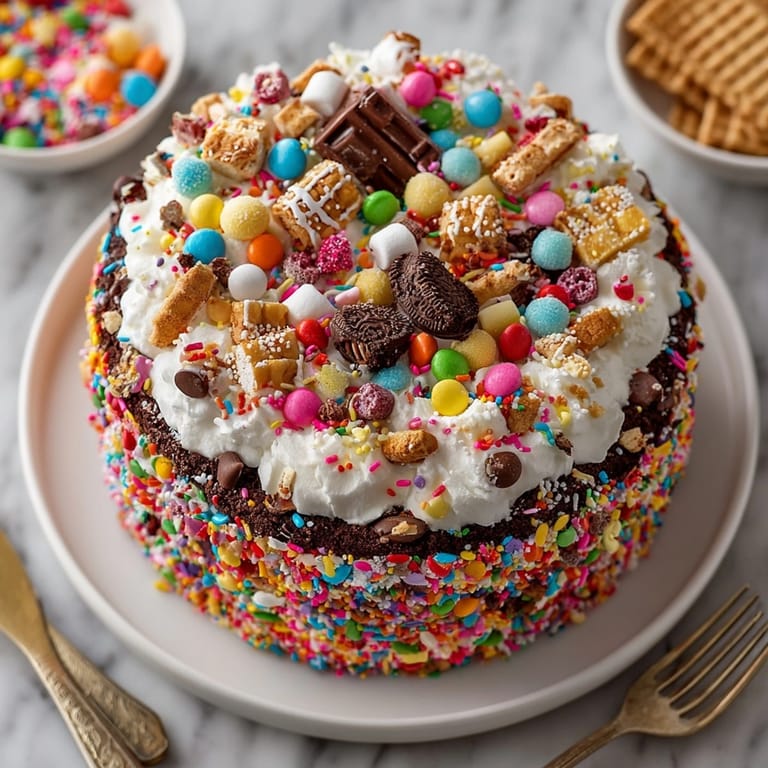
- This is where the magic happens. Use different colored frostings to pipe random patterns, swirls, or silly faces across your cake. Add sprinkles, candy eyes, marshmallows, and other decorations in a completely random, joyful pattern. The more chaotic and unplanned, the more delightful the result will be.
 Save
Save The candy eyes are my absolute favorite decoration element on this cake. Something magical happens when you add them to random spots on the frosting—suddenly your cake develops a personality all its own! My family now insists on chaos cakes for every celebration, with each person adding their own decorative touch to create a truly collaborative dessert experience.
Storage And Freshness
The Chaos Cake will maintain its best texture and flavor when stored at room temperature under a cake dome or loosely covered with plastic wrap for up to two days. The butter in the frosting creates a natural seal that helps preserve the cake's moisture. If you need to store it longer, refrigerate for up to five days, but always bring it back to room temperature before serving to restore the soft texture and full flavor profile.
Creative Variations
Turn your Chaos Cake into a seasonal masterpiece by adapting your decorations to match holidays or special occasions. For Halloween, use orange and black frosting with candy eyes and spider web designs. Christmas calls for red and green with crushed candy canes sprinkled on top. Birthday celebrations might feature the recipient's favorite candy or colors. The cake base remains the same while the decorative elements transform completely.
Make Ahead Options
Prepare this cake in stages when time is limited. The unfrosted cake layers can be baked up to three days ahead and stored wrapped tightly in plastic wrap at room temperature. Alternatively, freeze the cooled layers for up to three months by wrapping in plastic wrap and then aluminum foil. The buttercream can be made up to one week ahead and stored in an airtight container in the refrigerator—just bring to room temperature and rewhip before using.
Kid Friendly Decorating Party
Transform the decorating process into an interactive activity by setting up a cake decorating station. Prepare the base cake with a simple white frosting, then provide bowls of different colored frostings, piping bags, and various decorations. Let each participant decorate their own section of the cake. This approach works wonderfully for birthday parties, family gatherings, or any celebration where you want to create both memories and dessert simultaneously.
 Save
Save This cake is a delightful adventure for bakers and eaters alike. Embrace the mess and let your creativity shine as you transform this simple cake into a unique masterpiece.
Recipe FAQ
- → What makes this cake so colorful?
A mix of food coloring gels in the frosting and a variety of fun toppings like sprinkles, gummies, and more create a bright, lively look.
- → Can I make the cake layers in different colors?
Yes! Divide the batter and color each portion before baking for an extra colorful and surprising interior.
- → Is it possible to make this dessert gluten-free?
Absolutely, just substitute the all-purpose flour with a gluten-free blend for similar results.
- → How long will the decorated cake stay fresh?
The cake stays fresh for up to 2 days at room temperature or up to 5 days in the refrigerator if covered properly.
- → Are there any allergy considerations for the decorations?
Some decorations may contain soy, nuts, or other allergens, so always check packaging before serving to guests with sensitivities.
- → Can I prepare the cake in advance?
You can bake the layers a day ahead and assemble just before serving to keep decorations vibrant and fresh.