 Save
Save My nephew called me in a panic two weeks before his graduation, asking if I could bring something special to his party. I found myself at midnight scrolling through graduation party ideas when it hit me—why not make cupcakes with little graduation caps on top? The next morning, I tested the recipe and couldn't stop grinning as I assembled those tiny fondant caps. What started as a last-minute scramble turned into the most requested dessert at his celebration, with guests sneaking extras when they thought no one was looking.
I'll never forget watching a grandmother take a photo of her granddaughter's cupcake before eating it, holding it up like it was a tiny work of art. There was something about these little desserts that made everyone slow down and actually celebrate the moment instead of just grabbing food and moving on. That's when I realized these aren't just cupcakes—they're edible memories of accomplishment.
Ingredients
- All-purpose flour: The foundation of a tender crumb, and weighing it instead of scooping makes a real difference in how moist these turn out.
- Granulated sugar: Creates structure and moisture in the cake, so don't skip creaming it properly with the butter.
- Unsalted butter, softened: Room temperature butter creams smoothly and traps air, which gives you that light, fluffy texture everyone loves.
- Eggs: Bring them to room temperature too if you have time, they incorporate more evenly and add richness to the crumb.
- Whole milk: The acidity balances the sweetness and keeps everything tender and moist throughout baking.
- Baking powder: Your leavening agent, and fresh baking powder makes the difference between okay cupcakes and ones that rise perfectly.
- Pure vanilla extract: Not the imitation stuff—real vanilla has a warmth that makes people ask what your secret ingredient is.
- Powdered sugar, sifted: Sifting breaks up lumps so your frosting becomes cloud-like instead of grainy and gritty.
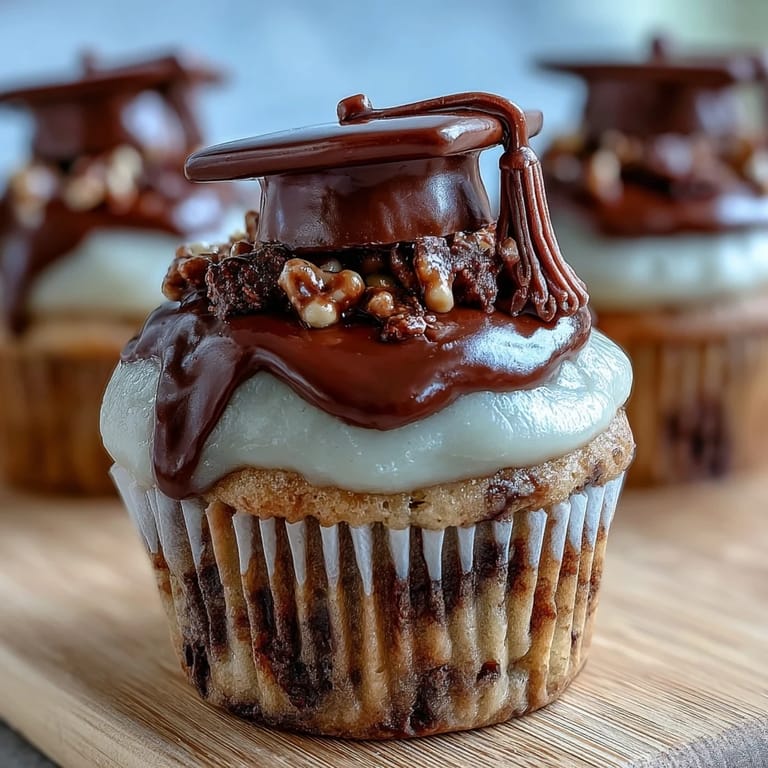
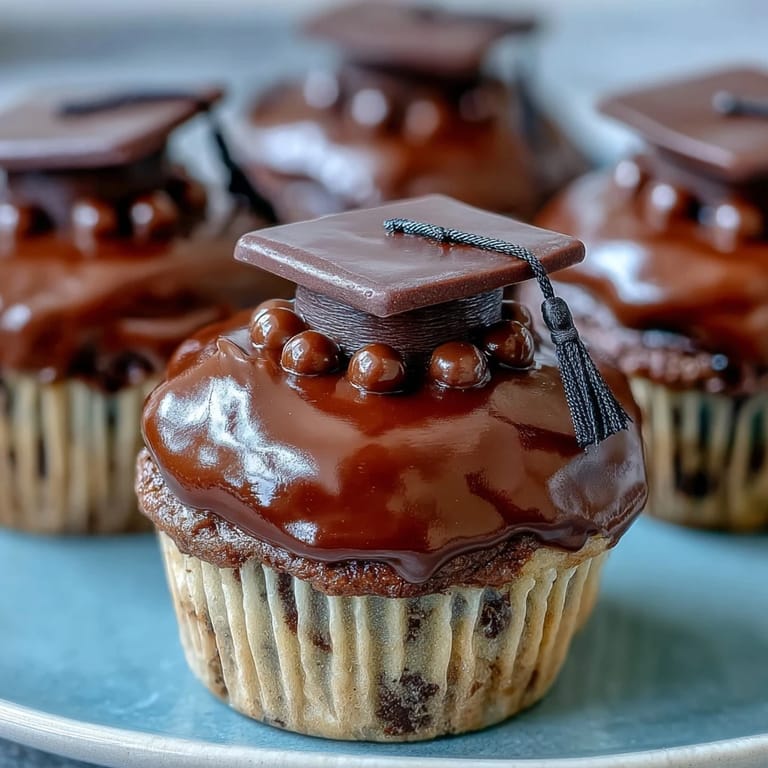
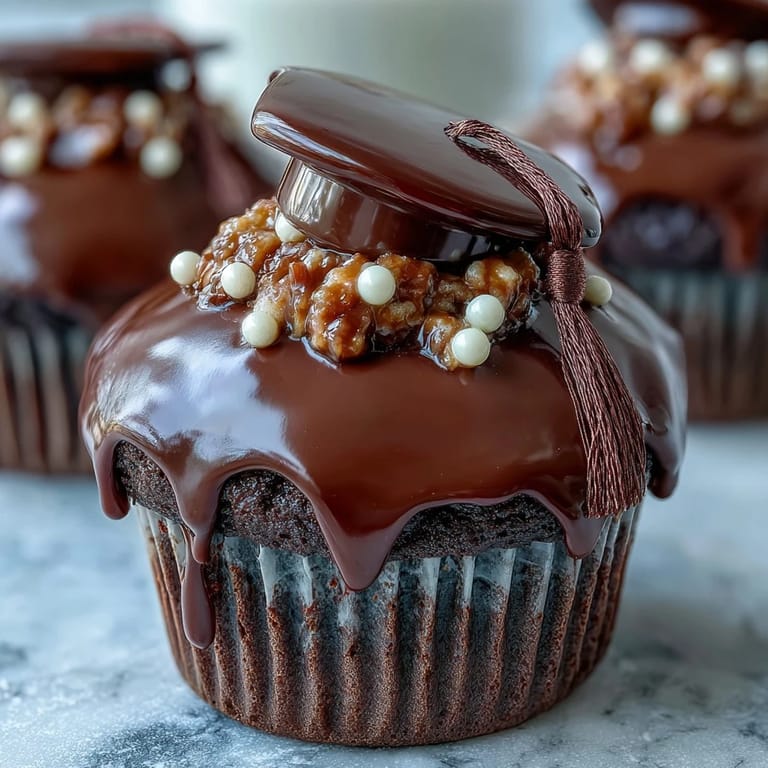
- Mini peanut butter cups: These become the base of your graduation cap and add a delicious surprise flavor, though swap for chocolate squares if you're avoiding nuts.
- Chocolate square candies: The flat surface of these candies makes them perfect cap roofs, and they set quickly when you attach the other pieces.
- String licorice or sour candy strips: These become your tassels and add that playful touch that makes people smile when they spot them.
- Mini M&Ms or candy pearls: The tiny button on top finishes the cap and adds a pop of color that matches school colors if you choose wisely.
Tired of Takeout? 🥡
Get 10 meals you can make faster than delivery arrives. Seriously.
One email. No spam. Unsubscribe anytime.
Instructions
- Prep your station:
- Line your muffin tin with paper liners and preheat the oven to 350°F. This takes two minutes but saves you from scrambling later when the batter is ready.
- Cream butter and sugar:
- Beat the softened butter and sugar together for about two minutes until it looks pale and fluffy, like mousse. You'll know it's right when it leaves a trail when you lift the beaters.
- Bring in the eggs:
- Add eggs one at a time, beating well after each one so they fully incorporate. This prevents lumps and creates a smooth, stable base for your batter.
- Mix the dry ingredients separately:
- Whisk together flour, baking powder, and salt in another bowl so everything is evenly distributed. This prevents dense pockets of baking powder that can taste bitter.
- Combine wet and dry:
- Add half the dry mixture, stir gently, then pour in the milk, then finish with the remaining dry ingredients. Mix just until you don't see white streaks—overmixing toughens the cake.
- Fill and bake:
- Divide batter evenly among liners, filling each about two-thirds full. Bake for 18 to 20 minutes until a toothpick comes out clean and the tops spring back when lightly touched.
- Cool completely:
- Let cupcakes sit in the tin for five minutes, then transfer to a cooling rack. They need to cool all the way before frosting or the frosting will melt into puddles.
- Make the frosting:
- Beat softened butter until it's smooth and pale, then gradually add powdered sugar while mixing so you don't create a cloud of sugar dust. Add milk, vanilla, and salt, then beat until it's fluffy and spreadable.
- Frost the cupcakes:
- Swirl frosting onto each cooled cupcake using a spoon or piping bag, making little peaks that look celebratory.
- Assemble the caps:
- Place a chocolate square flat-side up, attach a mini peanut butter cup upside-down in the center with a tiny dab of melted chocolate, then add a licorice tassel and an M&M button. Let everything set for a few minutes so it holds together.
- Top the cupcakes:
- Once your caps are set and firm, place one on top of each frosted cupcake just before serving.
 Save
Save There's something magical about watching people realize they're about to eat a cupcake topped with an actual edible graduation cap. The little moment of delight, the way they slow down and take a photo, the taste of buttercream and chocolate and that unexpected peanut butter surprise—these details matter on a day that's all about celebrating someone's hard work and achievement.
Timing and Make-Ahead Strategy
You can bake these cupcakes up to three days ahead and store them unfrosted in an airtight container, which means you're only frosting and assembling caps the day of your party. I've found that assembling the caps the night before works beautifully since the chocolate and frosting need time to set anyway. The whole process feels less rushed when you break it into steps instead of trying to do everything on celebration day.
Customizing for Your Celebration
While these are perfect as-is, I've learned that small tweaks make them feel personal. Adding school colors to the frosting, choosing candy pearls or M&Ms that match your color scheme, or even swapping vanilla for almond extract can make these feel uniquely yours. One mom I know added gold dust to the caps because her daughter's school colors were gold and blue, and it looked absolutely stunning.
Storage and Serving Tips
Room temperature is honestly the sweet spot for storing these cupcakes—they stay moist and the frosting stays creamy. If you're making them for an outdoor summer graduation party, keep them in a cool box until the last moment, since buttercream can get soft in heat. Here are a few final thoughts to make sure everything goes smoothly.
- Assemble the caps just a few hours before serving so the licorice tassels stay chewy and don't harden.
- If your frosting starts getting too warm while you're working, refrigerate it for fifteen minutes and it'll firm right back up.
- Keep any extra caps in an airtight container—they're honestly great to munch on and they look like little edible decorations.
 Save
Save These cupcakes remind me why I love baking for celebrations—you're not just feeding people, you're creating little edible tokens of their accomplishments. Every bite says congratulations in the most delicious way possible.
Recipe FAQ
- → What makes these cupcakes ideal for graduation celebrations?
The cupcakes feature edible caps crafted from chocolate candies and licorice tassels, adding a festive and themed touch perfect for graduation events.
- → Can I substitute ingredients for allergies?
Yes, peanut butter cups can be replaced with chocolate squares to make nut-free toppers suitable for those with allergies.
- → How should I store the cupcakes to keep them fresh?
Store cupcakes in an airtight container at room temperature for up to 2 days to maintain freshness and texture.
- → What is the best way to assemble the cap toppers?
Attach the mini peanut butter cup upside-down on a chocolate square using melted chocolate or frosting. Add a licorice strip as a tassel and a candy pearl as a button.
- → Can food coloring be added to the frosting?
Yes, food coloring can be mixed into the buttercream frosting to create custom colors matching school or party themes.