 Save
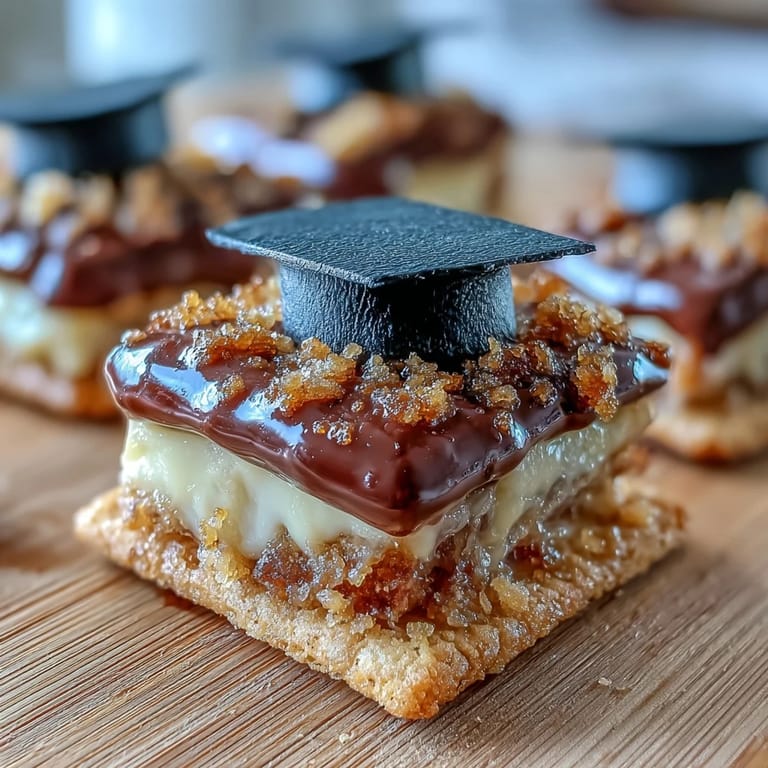
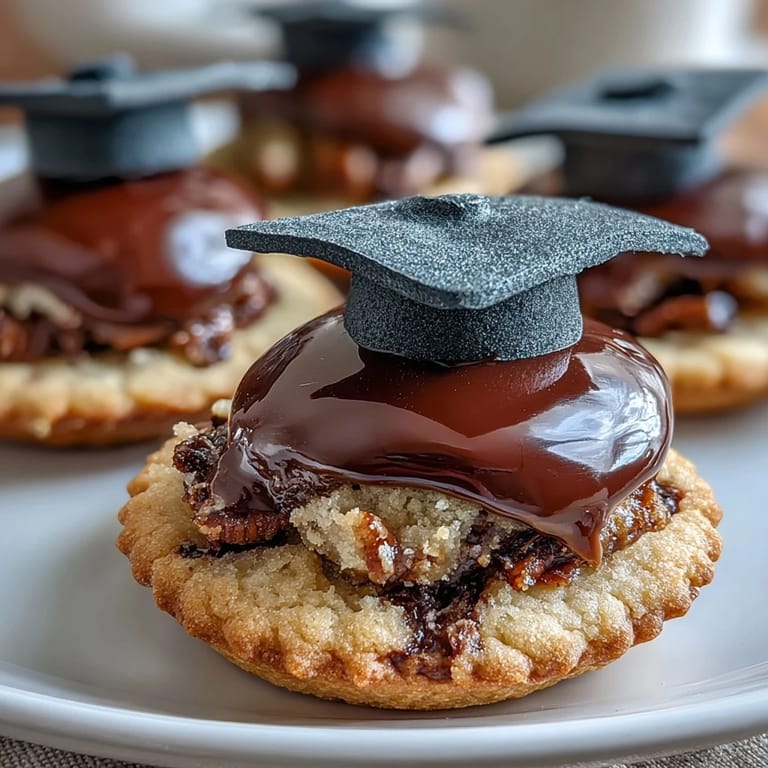
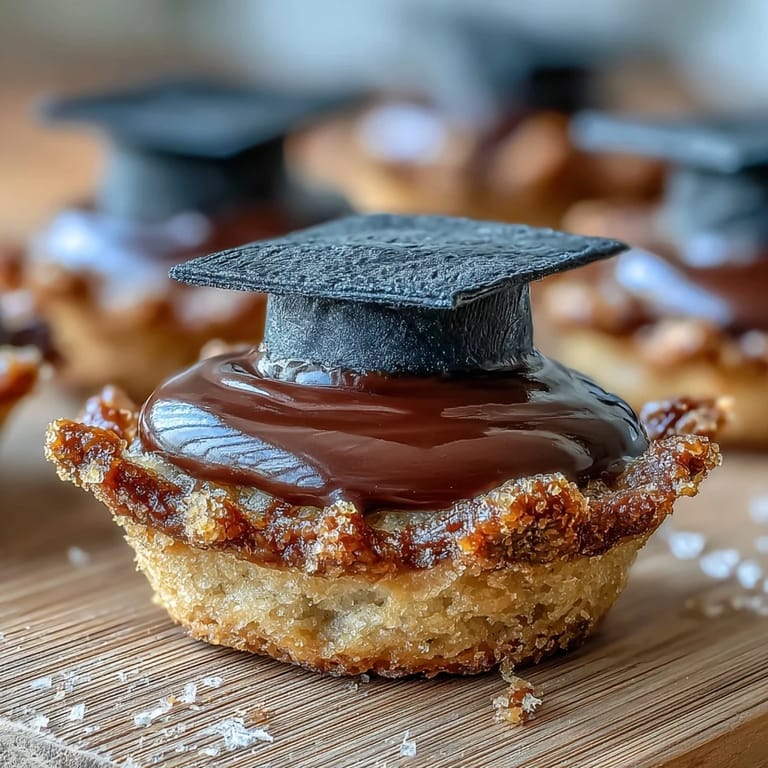
Save My niece called me three weeks before graduation, voice trembling with excitement, asking if I could make something special for her celebration party. I found myself standing in my kitchen at midnight, scrolling through graduation party ideas, when it hit me—cookies shaped like tiny celebrations, each one crowned with a little fondant mortarboard. By the time I'd made my first batch, I understood why these became her most-requested dessert. They're simple enough that anyone can master them, yet elegant enough to make graduates feel genuinely celebrated.
I'll never forget watching my sister's face light up when she walked into the kitchen and saw two dozen little graduates lined up on the counter. She immediately started snapping photos, and within minutes, three people were asking for the recipe. What struck me most wasn't just that they tasted good—it was that these cookies became part of the memory, something people talked about long after the party ended.
Ingredients
- All-purpose flour (2 1/2 cups): This is the foundation of your cookie, so don't skip the sifting step or your dough will feel tough instead of tender.
- Unsalted butter (1 cup, softened): Soft butter creams beautifully with sugar and creates that delicate texture that makes these cookies melt on your tongue.
- Granulated sugar (1 cup): This sweetness is what balances the buttery dough perfectly without overwhelming your palate.
- Baking powder (1/2 teaspoon): Just enough to give the cookies a gentle lift so they're not dense or heavy.
- Large egg (1): This binds everything together and adds richness to the dough.
- Pure vanilla extract (2 teaspoons): Don't use imitation here—real vanilla makes a noticeable difference in the final flavor.
- Black fondant (8 oz): The star of the decoration, and honestly, buying pre-colored fondant saves you serious time and mess.
- Yellow fondant (1 oz): Perfect for tiny tassels, though you can swap this for any school color that feels right.
- Powdered sugar (1 cup): Mixed into icing, this becomes your edible glue that holds the fondant decorations exactly where you want them.
- Milk (1–2 tablespoons): This thins your icing to the right consistency—add it slowly or you'll end up with something too runny.
- Cornstarch (for dusting): This prevents fondant from sticking to your work surface and rolling pin, saving you from a sticky nightmare.
Tired of Takeout? 🥡
Get 10 meals you can make faster than delivery arrives. Seriously.
One email. No spam. Unsubscribe anytime.
Instructions
- Prepare your baking station:
- Heat your oven to 350°F while you line two baking sheets with parchment paper. This moment of preparation prevents scrambling later when you're ready to bake.
- Mix your dry ingredients:
- Whisk together flour, baking powder, and salt in a medium bowl—you're essentially creating a safety net that distributes the leavening evenly throughout your dough.
- Cream butter and sugar:
- In a large bowl, beat softened butter and sugar together for about 2 to 3 minutes until the mixture looks pale and fluffy, like you've captured a cloud. This aeration is what makes your cookies tender rather than dense.
- Add egg and vanilla:
- Beat these in until everything is combined and smooth. Listen for the mixer to slow down slightly—that's when you know the egg is fully incorporated.
- Bring wet and dry together:
- Gradually add your dry ingredients to the wet mixture, stirring just until you don't see any streaks of flour. Overmixing here is the enemy of tender cookies.
- Roll and cut:
- Lightly flour your work surface and roll the dough to 1/4-inch thickness—thick enough to hold its shape but thin enough to bake evenly. Use whatever cookie cutter shape feels celebratory to you.
- Bake until golden:
- Bake for 10 to 12 minutes until just the edges turn golden while the centers stay soft. The cookies will firm up as they cool, so don't overbake or they'll become brittle.
- Cool completely:
- Place cooled cookies on a wire rack before decorating—warm cookies will melt your fondant decorations into sadness.
- Prepare fondant pieces:
- While cookies cool, dust your work surface with cornstarch and roll black fondant to 1/8-inch thickness. Cut 24 small squares for mortarboard tops and roll 24 tiny cylinders for the base—these don't need to be perfect.
- Create yellow tassels:
- Roll yellow fondant into thin ropes and cut into 1-inch pieces, then shape them however feels right. Some people curve theirs, others keep them straight—both look authentic.
- Make your icing:
- Whisk powdered sugar, milk, and vanilla until smooth and spreadable. If it's too thick, add milk drop by drop until it reaches the consistency of thick glue.
- Decorate with purpose:
- Use icing to secure a fondant square in the center of each cookie, add a cylinder underneath as the base, and top with a tiny yellow tassel. Think of yourself as an artist placing each element exactly where it belongs.
- Let decorations set:
- Give the icing 20 to 30 minutes to firm up before serving or packaging, which ensures your little mortarboards stay exactly where you positioned them.
 Save
Save There's something magical about handing someone a cookie decorated with their school colors and watching them hold it like it's almost too pretty to eat. One guest told me she saved one in a small box because it felt like keeping a piece of the celebration forever.
Customizing Your Mortarboard Colors
The beauty of fondant is that you can color it to match literally any school or team colors. I've made graduation cookies in deep purple and gold, forest green and white, even hot pink and silver. If you want to dye your own fondant instead of buying pre-colored, knead in gel food coloring a tiny bit at a time until you hit the shade you want. The fondant will stain your hands, but it washes off—and somehow that feels like part of the creative process.
Storage and Make-Ahead Strategy
I usually bake these cookies three days before the party and store them in an airtight container with parchment between layers so they don't stick together. Then I decorate them the morning of the celebration when I'm fresh and can give each mortarboard the attention it deserves. This approach means you're not stressed the night before, and your cookies taste fresher because they haven't been sitting decorated in humidity.
Shortcuts That Actually Work
Here's the honest truth: if you're short on time, you can absolutely use store-bought sugar cookie dough and still make these special with homemade fondant decorations. Nobody will judge you, and honestly, the mortarboard toppers are what make these memorable anyway. I've also seen people use royal icing instead of fondant for a simpler, flatter decoration, which is equally lovely and maybe even easier to execute if you're nervous about working with fondant.
- Pre-colored fondant eliminates the mess and uncertainty of trying to dye it yourself, saving you time and keeping your hands clean.
- If your fondant cracks, just add a microscopic amount of water and knead it back together—it's more resilient than you'd expect.
- These cookies freeze beautifully before decorating, so you can bake them weeks ahead and decorate whenever you're ready.
 Save
Save These cookies have become my go-to gift for any graduation, and I love knowing they carry a little piece of celebration into someone's special day. There's real joy in creating something so perfectly tied to a milestone moment.
Recipe FAQ
- → How do I achieve the perfect cookie texture?
Ensure the butter is softened and cream it well with sugar for a light dough. Do not overmix once adding flour to keep cookies tender.
- → What is the best way to roll fondant for decorations?
Dust your surface lightly with cornstarch to prevent sticking and roll the fondant evenly to about 1/8-inch thickness for easy cutting.
- → Can I prepare the cookies ahead of time?
Yes, cookies keep fresh in an airtight container for up to five days. Fondant decorations are best added just before serving.
- → What alternatives exist for dietary restrictions?
You can substitute with gluten-free flour, dairy-free butter, or egg replacers as needed, and verify fondant ingredients for allergens.
- → How do I store decorated cookies properly?
Allow decorations to set fully before stacking. Store cookies in an airtight container at room temperature to maintain freshness.